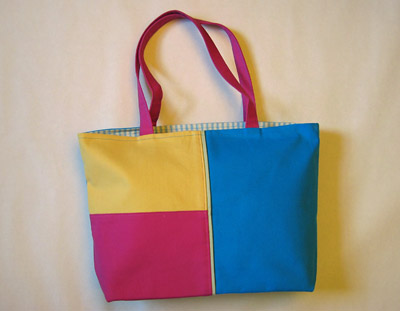
Canvas Tote Bag
Project Information
by Carol R. Zentgraf Design & Editorial Services
Materials:
- James Thompson Duck Canvas: 1/2 yard each of turquoise and fuchsia; 1/4 yard each of maize and sage
- James Thompson Stripe Ticking: 5/8 yard of sky blue
- 4" x 14" cardboard rectangle
- Fabri-Tac permanent fabric adhesive
- Matching sewing thread
- Scissors or rotary cutter and mat
- Clear ruler
- Fabric marking pen
- Iron and pressing surface
- Sewing machineLiquid soap or stencil cleaner
Instructions:
Use a 1/2" seam allowance and sew seams with right sides together unless otherwise indicated.
- From the turquoise canvas, cut one 10" x 15" rectangle for a front panel and one 19" x 15" rectangle for the back. From the fuchsia canvas, cut one 10" x 9" rectangle for a front panel and two 4" x 23" strips for the handles. From the maize canvas, cut one 10" x 7" rectangle for a front panel. From the sage canvas, cut one 1 1/2"x 15" strip.
- To assemble the front panels, sew the long edges of the fuchsia and maize rectangles together. Press the seam open. Press the sage strip in half lengthwise. With raw edges even, baste the folded sage strip to the left long edge of the turquoise front panel. Sew the pieced maize and fuchsia rectangles to the left long edge of the turquoise front panel, sandwiching the sage strip in the seam. Press the seam toward the maize/fuchsia panels and topstitch close to the edge of the maize/fuchsia panel.
- Sew the back panel to the pieced front panel along the side and lower edges; do not turn right side out. To create the boxed corner on each end of the bottom of the bag, fold the bag so the bottom and side seams are aligned, creating a pointed corner, and pin. Place a ruler across the point, aligning the 2" mark with the seam, the end of the ruler with one side of the point and the 4" mark with the opposite side of the point. Draw a line across the point. Sew the layers together along the line. Trim the point 1/2" from the seam and press toward the bottom of the bag. Turn the bag right side out. Using Fabri-Tac, glue the cardboard rectangle into the bottom of the bag.
- To make the handles, press each strip in half lengthwise, then press the long edges to meet at the center fold. Sew along both long edges of the folded strips with turquoise thread. Pin the short ends of one handle to the top edge of the tote front right side, 5" from each side seam. Repeat to pin the remaining handle to the tote back right side.
- To make the lining, repeat Step 3 with the striped ticking fabric, leaving a 6" opening in the center of the bottom seam. Place the bag inside the lining with right sides together and upper edges even. Sew the upper edges of the bag and lining together. Pull the bag through the opening in the lining, turning the lining right side out. Sew the opening closed and insert the lining in the bag. Press the top edge of the tote and topstitch 1/2" from the edge to secure the lining.
For diagrams and patterns please download the PDF instructions.
PLEASE NOTE: We try to accurately represent the product colors on our
website, but internet colors may differ from actual fabric color. Please
request a sample to check actual color!