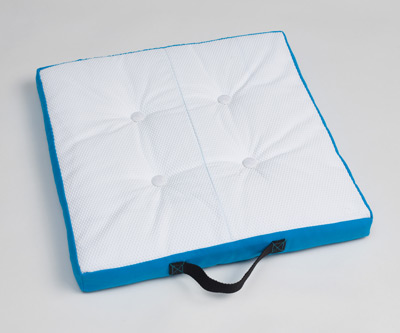
Non-Slip Stadium Cushion
Project Information
by Carol R. Zentgraf Design & Editorial Services
Size
18" x 18" x 2"
Materials
- 5/8 yard Turquoise Dyed Canvas
- 1 yard Grip-Tight Cloth
- 18" square of 2"-thick Nu-foam upholstery foam alternative
- 11" of 1"-wide black webbing
- Eight 1/2"-diameter cover buttons
- Thread: all-purpose thread to match fabrics; waxed button thread
- Basic sewing supplies and tools, including 6"-long upholstery needle
Instructions
Note: All seams are 1/2"-wide with right sides sewn together.
Cutting:
From the turquoise canvas, cut:
- One 19" x 19" square (cushion top)
- Four 3" x 19" strips (sides)
From the grip-tight fabric, cut:
- Two 10" x 19" rectangles (cushion bottom)
- Sew the long edges of the grip-tight rectangles together to make a 19" square.
- To add the handle, mark the center of one canvas side strip. Mark 3 1/4" from each side of the center for the edge of the handle. Turn each end of the webbing under 1" and sew to the canvas at the marks.
- Sew the short edges of the side strips together to 1/2" from the ends.
- Sew the side strips to the canvas square with the side seamlines at the corners of the square. Repeat to sew the side strips to the grip-tight square, leaving 10" open in the seam of the back strip (strip opposite from the handle strip. Turn right side out and press the canvas seams. Note: Do not touch the hot iron to the grip-tight fabric.
- Insert the Nu-foam square in the opening. Turn under the opening seam allowances and slipstitch the opening closed.
- Follow the manufacturer's instructions to cover the buttons with black fabric. Mark four equally-space button placements in the center of the top and bottom of the cushion.
- To tuft the cushion at each set of marks, cut a 12" length of waxed button thread and slide the shank ofone button onto the center of the thread. Insert both thread ends through the eye of the upholstery needle. Stitch through the cushion at one mark on the top, bringing the needle out at the corresponding mark on the bottom. Remove the needle. Slide the shank of a second button onto one of the thread ends. Tie the thread ends together, pulling to tuft the cushion. Knot the thread ends together securely and trim the ends under the button. Repeat for the three remaining sets of marks.
For diagrams and patterns please download the PDF instructions.
PLEASE NOTE: We try to accurately represent the product colors on our
website, but internet colors may differ from actual fabric color. Please
request a sample to check actual color!


