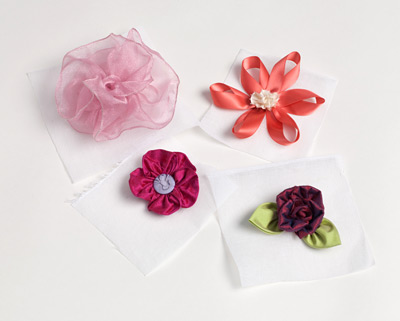
Fabric and Ribbon Flowers on Crinoline
Project Information
by Carol R. Zentgraf Design & Editorial Services
Description
Ribbon and fabric flowers are trendy and stylish for both apparel and home decorating projects, and it's easy to make your own. Add them to sewing projects you are making or to purchased ready-to-wear or decorative accessories. To maintain their shape and body, it's best to remove these flowers before laundering, and constructing them on crinoline makes this easy to do.
Crinoline provides an ideal base for constructing flowers one petal at a time or for securing the base of gathered flowers. You can also use it to create designs of any shape by constructing multiple flowers and leaves on it in the shape desired, then cutting away the excess crinoline. When hand stitched to the item being embellished, only the floral design will show—the stitches securing the crinoline can easily be removed for laundering the garment or for using the floral design elsewhere.
The four flower styles shown are all large for easy viewing; cut the pieces smaller or larger as desired to make any size flower.
Materials:
General Materials for each flower:
- 4" square of crinoline
- All-purpose thread
- Hand sewing needle
- Scissors
- Tracing paper
Silk Posy with Button Center
Additional Materials:
- 5" x 15" piece of silk dupioni fabric
- 3/4"-diameter button with shank
- Petal pattern below
Instructions:
- Trace the petal pattern onto tracing paper and cut it out. Use the pattern to cut five petals from the silk fabric.
- Fold each petal in half lengthwise. Hand sew the long edges together with a gathering stitch, then pull the thread to gather the edge. Stitch back through the gathered edge to secure and knot the thread. Sew the gathered edge to the center of the crinoline square. Repeat to construct the four remaining petals and sew to the crinoline, overlapping the centers.
- Sew the button to the center of the flower.
- Trim the crinoline 1/4" from the base of the flower.
Silk Rose with Leaves
Additional Materials:
- 5" x 15" piece of silk dupioni fabric for flower
- Two 3" squares of green silk dupioni fabric for leaves
- 3/4"-diameter button with shank
- Petal pattern below
Instructions:
- Trace the petal pattern onto tracing paper and cut it out. Use the pattern to cut six petals from the silk fabric; one will be the center.
- Fold each petal in half lengthwise. Hand sew the long edges together with a gathering stitch, then pull the thread to gather the edge. Stitch back through the gathered edge to secure and knot the thread.
- To make the flower center, tightly roll the gathered edge of one petal and stitch back and forth across the bottom to secure. Stitch the base of the flower center to the center of the crinoline square. Overlap the petals around the base of the flower center, sewing the bottom of the petals to the center and to the crinoline.
- To make each leaf, fold a green square in half diagonally, then fold it in half diagonally again. Use a gathering stitch to sew the raw edges together, then pull the thread to gather. Stitch back through the gathered edge and knot the thread to secure. Sew the gathered edge to the crinoline at the base of the flower.
- Trim the crinoline around the assembled flower and leaves.
Wired Ribbon Rosette
Additional Materials:
- 1 yard of 2 1/2"-wide wired sheer ribbon
Instructions:
- On one edge of the wired ribbon, pull the wire from each end to gather the ribbon tightly on the center of the wire.
- Thread one wire end through the eye of the needle. Roll the gathered edge tightly, stitching back and forth through the roll with the wire until it is tightly secured.
- Stitch the base of the flower to the center of the crinoline, using the wire. Twist the wire ends together on the underside of the crinoline.
- Trim the crinoline 1/4" from the base of the flower.
Ribbon Daisy with Rosette Center
Additional Materials:
- 30" of 5/8"-wide double-sided satin ribbon for flower
- 10" of 5/8"-wide double-sided satin ribbon for center
Instructions:
- Cut the ribbon for the flower into six 5" strips. Overlap the ends of each strip and sew together, gathering slightly.
- Overlap and sew the gathered ends of the loops to the center of the crinoline.
- Sew a gathering stitch along one edge of the ribbon for the center. Pull the thread to tightly gather the ribbon edge and knot to secure. Roll the edge tightly, stitching back and forth through the roll to secure. Sew the base of the roll to the center of the flower and crinoline.
- Trim the crinoline 1/4" from the base of the flower.
For diagrams and patterns please download the PDF instructions.
PLEASE NOTE: We try to accurately represent the product colors on our
website, but internet colors may differ from actual fabric color. Please
request a sample to check actual color!