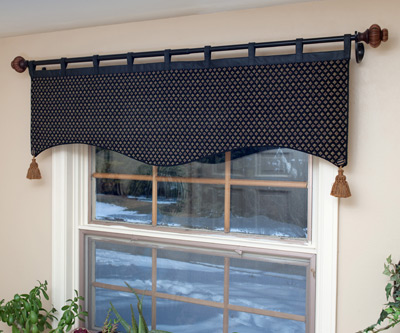
Tab Top Window Valance with Buckram
Project Information
by Carol R. Zentgraf Design & Editorial Services
Size
14"-long with 2"-long tabs x custom width to fit window
Materials
- Curtain rod, 2" to 4" wider than window
- Fabrics: decorator fabric, faux leather or suede and buckram in yardages determined in Step 1
- Twisted cording with lip in yardage to go around sides and lower edges of valance
- Low-loft batting
- All-purpose thread to match fabric
- Basic sewing supplies and tools
- Tracing paper
- Collins Wonder Tape, self-adhesive, double-sided basting tape
- Two cover buttons
- Two tassels
Instructions
- To determine the width of the valance, measure the window width. Add 2" to 4" for the side extensions, plus 1" for seam allowances; this is the width you will cut the valance panel. If the width exceeds the fabric width, you will need to plan to piece two panels. The cut length of the panel is 15" long. Use these measurements to plan the yardage for cutting two panels from the decorator fabric, one panel from the batting and one panel from the buckram.
- Cut a rectangle of tracing paper that is 15" x the determined cut width of the panel, piecing the fabric if necessary. Fold the paper in half crosswise. Refer to the photo and draw a line to shape the lower edge into a curve. Cut the pattern out through both layers. Use the pattern to cut two pieces from the decorator fabric and one each from the batting and buckram.
- With the cording toward the center and 1/2" from the edge, baste the lip to the valance front along the side and lower edges.
- Baste the batting to the wrong side of the front decorator fabric panel and the buckram to the wrong side of the back decorator fabric panel. With right sides facing, use a 1/2" seam allowance to sew the decorator fabric panels together along the side and lower edges. Trim the seam allowance and clip the corners and curves. Turn right side out and press. Baste the upper edges together.
- For the faux suede or leather upper edge trim and tabs, measure the width of the sewn panel. Cut a 2"-wide strip in the same length as the valance width. For the tabs, plan to place one at each end and approximately 5" apart across the top of the valance. Cut a 1 1/2" x 6" strip for each tab.
- Using a fabric marker, draw a line 1" from the upper edge on each side of the valance. Apply basting tape to the long edges of the trim strip wrong side. Remove the paper backing from the trim strip. Wrap the trim strip over the top edge, aligning the edges with the marked lines and pressing in place to adhere. Topstitch through all layers, stitching 1/4" from the edge.
- For each tab, fold the strip in half lengthwise and topstitch close to the edge. Wrap the ends over the top trim strip, aligning the ends of the tab with the bottom edge of the trim. Stitch the ends of the tab in place, positioning them as planned in Step 4.
- Following the manufacturer's instructions, cover the buttons with fabric. Referring to the photo, sew a button to each end of the valance and hang the loop of a tassel over the button.
For diagrams and patterns please download the PDF instructions.
PLEASE NOTE: We try to accurately represent the product colors on our
website, but internet colors may differ from actual fabric color. Please
request a sample to check actual color!