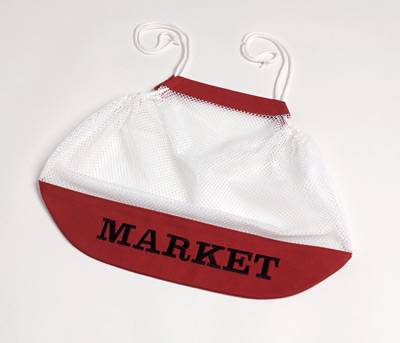
Utility Mesh and Canvas Market Bag
Project Information
by Carol R. Zentgraf Design & Editorial Services
Size
18" x 19" (excluding drawstrings)
Materials
- 1/2 yard of utility mesh
- 1/2 yard of dyed canvas in color of choice
- 1/2 yard of double-fold bias tape
- 2 yards of drawstring cord
- Clear, water-soluble stabilizer
- Black rayon machine embroidery thread
- All-purpose thread to match fabric
- Basic sewing supplies and tools, including sewing machine with embroidery capabilities
- Large sheet of tracing paper or pattern tracing cloth
- Safety pin
Instructions
Use a 1/2" seam allowance and sew seams with right sides together.
- For the embroidered bottom panel, cut an 8" x 22" rectangle of canvas. Place it in the machine embroidery hoop with stabilizer on the wrong side. Program your machine to embroider "MARKET" and stitch it along the center of the strip. Remove the strip from the hoop and tear or rinse away the stabilizer.
- Fold the tracing paper or pattern tracing cloth in half. Place the folded edge on the fold line of the pattern and trace the pattern. Cut the pattern out through both layers to create a whole bag pattern. Use the pattern to cut two complete bag shapes from the utility mesh, adding a 1/2" seam allowance to all edges except the top edge. Cut four top border pieces and two bottom border pieces, adding 1/2" seam allowances to all edges and centering the lettering on one bottom border piece.
- Press the upper edge of each bottom border piece under 1/2" and pin in place. Pin a bottom border piece right-side-up to the bottom edge of each utility mesh panel and baste the curved edges together.
- Pin the utility mesh pieces together, with the bottom canvas borders facing and aligned. Serge the side and bottom edges together. Or sew the edges together, trim seam allowances to 1/4" and stitch together using a zigzag stitch. Turn right side out and press.
- To add the top border strips, sew the top edges of two border strips together. Turn right side out and press. Press the bottom edges under 1/2". Repeat with the two remaining top border strips. Place one set of strips over the top edge of the mesh bag front, aligning the side edges, and pin in place. Topstitch the folded bottom border edges to the mesh. Repeat for the mesh bag back.
- Finish the raw edges on each side of the bag with serging or zigzag stitches. Press each edge under 1/2" and edgestitch in place to make a channel for the cording. Cut the drawstring cording in half. Attach a safety pin to one end of a cording length and use the pin to guide the cording through a channel. Remove the pin and knot the cording ends together. Repeat for the remaining cording and channel.
For diagrams and patterns please download the PDF instructions.
PLEASE NOTE: We try to accurately represent the product colors on our
website, but internet colors may differ from actual fabric color. Please
request a sample to check actual color!