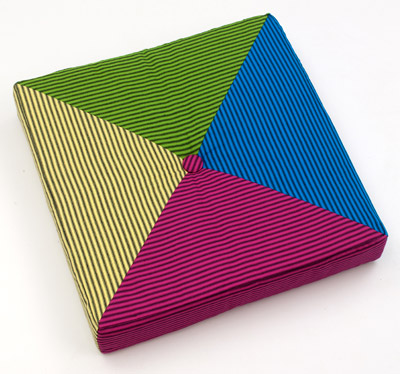
Wild Stripes Floor Pillow
Project Information
by Carol R. Zentgraf Design & Editorial Services
Have fun with stripes when you use them to create decorative patterns. By cutting the panels for this fun-loving floor pillow with the stripes placed horizontally to the edge you create a square design. When you cut them with the stripes placed vertically to the edge, a V-shaped pattern results.
Size: 22" x 22" x 4"
Materials:
- 1/2 yard each of four colors of Wild Stripes Ticking
- 22" x 22" square of Nu-Foam Upholstery Foam Atlternative
- Two Dritz Cover Buttons
- Waxed button thread
- 6"-long upholstery needle
- Clear ruler, at least 24" long
- Pattern tracing cloth or large sheet of unprinted paper
Instructions:
Note: Use a 1/2" seam allowance and sew with right sides together.
- Draw a 22" x 22" square on the paper. Draw lines from corner to corner to create four equal triangles. Using the clear ruler, add 1/2" seam allowances to all sides of one triangle. Cut this triangle out to use for a pattern, discarding the other three triangles.
- Place the pattern on one ticking color, aligning the base of the pattern with the ticking stripes. Cut the triangle from the fabric. Repeat to cut an identical triangle from the three remaining colors. This will be one side of your pillow.
- For the opposite side, place the pattern on one ticking color with the ticking stripes running perpendicular to the base of the pattern. Cut an identical triangle from each color.
- For the side of the pillow, cut one 5" x 23" strip from each color.
- Sew each set of triangles together to make a square and press. Sew the short ends of the strips together. Sew the side strips to the panels, matching corners and leaving one long edge open. Insert the upholstery foam square and slipstitch the opening closed.
- Follow the manufacturer's instructions to cover the buttons with fabric. Slide one button shank onto a length of waxed button thread. Insert both thread ends through the eye of the upholstery needle and stitch through the center of the pillow, pulling the button tightly to the pillow. Remove the needle and tie the thread ends around the shank of the remaining button. Pull tightly to slightly tuft the center of the pillow. Knot the threads securely and trim the ends.
For diagrams and patterns please download the PDF instructions.
PLEASE NOTE: We try to accurately represent the product colors on our
website, but internet colors may differ from actual fabric color. Please
request a sample to check actual color!


